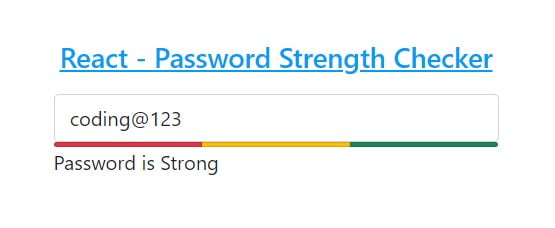
Hello Developer, I have shared a source code of a Password Strength Checker in react js with some simple steps that are very easy to understand.
You have also filled many registration forms on many websites and got a password strength notification in the form of text & a single line just below the password input field. You definitely liked and wanted to integrate this feature into your website. So, Don’t worry, here you will learn it easily with some simple steps
If you are going to create a signup/registration form on your website, then you should also add a React password strength meter. So that, users can easily get the warning error of the poor password, weak password &strong password When they enter the password into the input field.

Validate Password with Strength Meter using React Js
In this tutorial, I have created functionality to react password strength checker using functional components. Once, you learn it, you can easily create it yourself using the class component.
Learn Also –
Add & Remove Multiple Input Field Dynamically in React Js
How to Display Form Data in Table using React Js
Add and Delete Table Rows Dynamically using React Js
Before getting started, you have to create react app with npm and create the following folders & files within its default folder structure
reactapp/
  |__public/
  |    |__images/
  |__src/
  |   |
  |  password-strength-checker
  |       |__PasswordStrengthChecker.js
  |__App.js
  |__index.js
I have used bootstrap 4 to create a responsive weather app. So, You should install it in your react app.
For more information, you can learn How to use Bootstrap in React Js
1. Create Password Strength Checker Component
File Name – PasswordStrengthChecker.js
import React from "react";
import { useState } from "react/cjs/react.development";
import PasswordInputField from "./PasswordInputField";
import StrengthMeter from "./StrengthMeter";


function PasswordStrengthChecker(){

    const [passwordInput, setPasswordInput] = useState("");
    const [poorPassword, setPoorPassword] = useState(false);
    const [weakPassword, setWeakPassword] = useState(false);
    const [strongPassword, setStrongPassword] = useState(false);
    const [passwordError, setPasswordErr] = useState("");

const handlePasswordChange=(evnt)=>{
    setPasswordInput(evnt.target.value);

}

const passwordStrength=(evnt)=>{

    const passwordValue= evnt.target.value;
    const passwordLength= passwordValue.length;

    const poorRegExp = /[a-z]/;
    const weakRegExp = /(?=.*?[0-9])/;;
    const strongRegExp = /(?=.*?[#?!@$%^&*-])/;
    const whitespaceRegExp = /^$|\s+/;

    const poorPassword= poorRegExp.test(passwordValue);
    const weakPassword= weakRegExp.test(passwordValue);
    const strongPassword= strongRegExp.test(passwordValue);
    const whiteSpace= whitespaceRegExp.test(passwordValue);

    if(passwordValue===''){
        setPasswordErr("Password is Empty");
    }else{

        // to check whitespace
        if(whiteSpace){
            setPasswordErr("Whitespaces are not allowed");
        }
        // to check poor password
        if(passwordLength <= 3 && (poorPassword || weakPassword || strongPassword))
        {
        setPoorPassword(true);
        setPasswordErr("Password is Poor");
        }
        // to check weak password
        if(passwordLength>= 4 && poorPassword && (weakPassword || strongPassword))
        {
            setWeakPassword(true);
            setPasswordErr("Password is Weak");
        }else{
        setWeakPassword(false);
        }
        // to check strong Password
        if(passwordLength >= 6 && (poorPassword && weakPassword) && strongPassword)
        {
            setStrongPassword(true);
            setPasswordErr("Password is Strong");
        }else{
           setStrongPassword(false);
        }
    }

}

   return(

       <div className="row">
           <div className="col-sm-4">
           <PasswordInputField handlePasswordChange={handlePasswordChange} passwordValue={passwordInput} passwordStrength={passwordStrength} />
           <StrengthMeter poorPassword={poorPassword} weakPassword={weakPassword} strongPassword={strongPassword} passwordError={passwordError} />
           </div>
       </div>

   )

}

export default PasswordStrengthChecker;
2. Create Password Input Field Component
File Name – PasswordInputField.js
function PasswordInputField({handlePasswordChange, passwordValue, passwordStrength}){


    return(
        <div className="form-group">
        <input type="password" onChange={handlePasswordChange} onInput={passwordStrength} value={passwordValue} name="password" placeholder="Password" className="form-control" />
        </div>
    )
}

export default PasswordInputField;
3. Create Password Strength Meter Component
File Name – StrengthMeter.js
function StrengthMeter({poorPassword, weakPassword, strongPassword, passwordError}){

    return (
        <>
        <ul className="list-group list-group-horizontal">

           {poorPassword===true?<li className="list-group-item bg-danger col-4" style={{padding:"1px 0px"}}></li>:''}
            {weakPassword===true?<li className="list-group-item bg-warning col-4" style={{padding:"1px 0px"}}></li>:''}
            {strongPassword===true?<li className="list-group-item bg-success col-4" style={{padding:"1px 0px"}}></li>:''}

      </ul>
      <p> {passwordError}</p>
      </>


    )
}

export default StrengthMeter;
4. Render Password Strength Checker Component
To render the password strength checker component, you will have to import it in the App component and render it as <PasswordStrengthChecker /> within the return() method.
File Name – App.js
import "../node_modules/bootstrap/dist/css/bootstrap.min.css";
import PasswordStrengthChecker from "./password-strength-checker/PasswordStrengthChecker";
function App() {
  render(){
  return (
    <PasswordStrengthChecker/>
  )
  }
}
export default App;
5. Run App to Test Password Strength Checker
First of all, you have to run the following command to run the app.
npm start
Now, you can see the running password strength checker yourself by opening the following URL in your web browser
http://localhost:3000
