
jQuery Todo App: In most cases, you need to add multiple text lists dynamically through a single input field. Because It can quickly add and remove the text list. So It is very useful for the project to add a large text list at a time.
I have shared this tutorial with a simple jquery to-do list example. you will get a simple script to develop it that is very simple to use. So, Read the whole steps and share with your friends those who searching for this type of functionality.
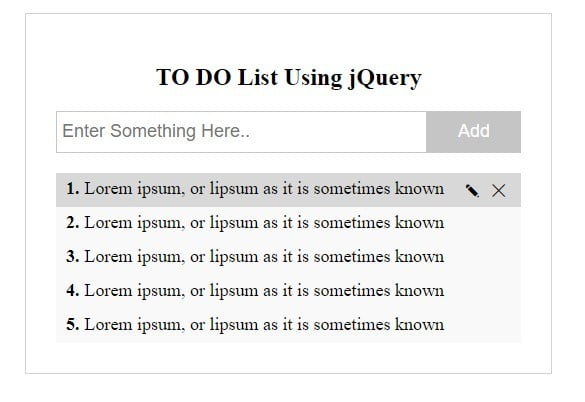
Build a Todo List in JQuery Code
Features –
Now, Read the following features of the TO DO List.
- You can add new content to the list by clicking the Add button & pressing Enter Key.
- Edit & Delete icon will be visible by hovering on the content list.
- You can remove the existing content from the list by clicking the delete icon button.
- You can also edit & update the existing content by clicking the edit & update icon button respectively.
- It is absolutely free & easy to integrate into your projects.
- You can create more than one TO DO App on the same page.
Read Also –
Folder Structure –
Create the following folder structure. Either you can use it or create your own folder structure.
todo-list/
    |__todo-form.php
    |__style.css
    |__todo-script.js
    |
1. Create HTML Todo Form
Configure the following points to create HTML todo input field –
- Include jquery CDN to run custom jquery script
- Include external CSS file
style.cssand Javascript filetodo-script.js. - Create todo form with a text input field & button filed (
class="add-todo")
File Name – todo-form.php
<!DOCTYPE html>
<html>
<head>

<script src="https://ajax.googleapis.com/ajax/libs/jquery/3.4.1/jquery.min.js"></script>
<script type="text/javascript" src="todo-script.js"></script>
<link rel="stylesheet" href="style.css" type="text/css">

</head>
<body>

<!--===first todo list ====-->
<div class="todo-content">
<h2 style="text-align:center">TO DO List Using jQuery</h2>
<div class="todo-input">
<input type="text" Placeholder="Enter Something Here..">
<button class="add-todo">Add</button>
</div>
<div class="error"></div>
<div class="todo-list">

</div>
</div>
<!--===first todo list ====-->


</body>
</html>
2. Customize Todo List Using CSS
Use the following CSS code to customize the Toto list and form.
File Name – style.css
.todo-content{
  width: 50%;
  border: 1px solid lightgray;
  padding: 30px;
  margin:50px;
}
.todo-input{
  display:flex;
  width:100%;
  margin-bottom:20px;
}
.todo-input input{
  width: 100%;
  padding: 5px 5px;
  height: 30px;
  border: 1px solid #c5c5c5;
  font-size: 18px;
}
.todo-input input:focus{
  outline:unset;
}
.list-row textarea:focus{
  outline:unset;
}
.list-row textarea{
  width:100%;
  background:transparent;
  border:none;
  color:green;
  font-size:17px;
}
.list-row textarea:focus{
  outline:unset;
}

.todo-input button{
  padding: 5px 30px;
  background: #c5c5c5;
  color: white;
  border: 1px solid #c5c5c5;
  cursor: pointer;
  transition:.5s;
  font-size:18px;
}
.todo-input button:hover{
  background:#b5b3b3;
}
.todo-input button:focus{
  outline:unset;
}
.line-through{
  text-decoration:line-through;
}
.right{
  float:left
}
.edit-todo,.update-todo,.remove-todo{
  padding: 0px 5px;
  cursor:pointer;
}
.list-num{
  font-weight:bold;
  padding-right:5px;
}
.todo-content .todo-list{
  list-style-type: none;
  padding-left: 0px;
  background: #f9f9f9;
}
.todo-content .list-error,.error{
  color:red;
}
.todo-content .todo-list .list-row{
  padding:5px 10px;
  position:relative;
  word-break: break-all;
  display:flex;
  font-size:18px;
  transition:.1s;
  cursor:pointer;
}
.todo-content .list-row .list-data,.todo-content .list-row .update-data{
  width:100%;
  text-align:justify;
}
.todo-content .todo-list .list-row:nth-child(even){
  background:#e4e4e4;
}
.todo-list .edit-todo,.remove-todo,.update-todo{
  visibility:hidden;
}
.todo-content .todo-list .list-row:hover{
  background:#d8d8d8;
}
.todo-content .todo-list .list-row:hover .edit-todo{
  visibility:visible;
}
.todo-content .todo-list .list-row:hover .remove-todo{
  visibility:visible;
}
.todo-content .todo-list .list-row:hover .update-todo{
  visibility:visible;
}
3. Create jquery Todo List Script
To create a jquery todo list script, You will have to configure the following points –
- First of all, Write jquery script to add a todo list with a click event to the button class
.add-todo - use
keydownevent method to add a to-do list by pressing the enter key. - remove todo list with a click event to the cross button class
.remove-todo - edit todo list with a click event to the edit button class
.edit-todo - updated todo list with a click event to the tick button class
.update-todo - draw a single line over the todo list with a click event to the todo list class
.list-data
File Name – todo-script.js
// add to do list script
var i=1;
$(document).on('click','.add-todo',function(){
var todoInputData=$(this).siblings('input').val();
var todoListData=`<div class="row-parent">
<div class="list-row">
<div class="list-num">`+i+`.</div>
<div class="list-data">`+ todoInputData+`</div>
<div class="edit-todo">✎</div>
<div class="remove-todo">✕</div>
</div>
<div class="list-error"></div></div>`;
if($.trim(todoInputData)=='')
{
$(this).parents('.todo-content').find('.error').text('You must enter something!');
}
else{
$(this).parents('.todo-content').find('.todo-list').append(todoListData);
i++
$(this).parents('.todo-content').find('.error').empty();
}
$(this).siblings('input').val('')
});
// add todo list on pressing Enter key
$(document).keydown(function (event) {
if (event.which == 13) {
event.preventDefault();
$('.add-todo').click();
}
});
// remove todo list script
$(document).on('click','.remove-todo',function(){
$(this).parent('.list-row').remove();
})
// edit todo list script
$(document).on('click','.edit-todo',function(){
$(this).attr('class','update-todo');
$(this).html('✓');
var listText= $(this).parent('.list-row').find('.list-data').html();
var listDataHeight=$(this).parent('.list-row').find('.list-data').innerHeight();
$(this).parent('.list-row').find('.list-data').attr('class','update-data');
if(listDataHeight>50){
$(this).parent('.list-row').find('.update-data').html('<textarea style="height:'+listDataHeight+'px">'+listText+'</textarea>');
}else{
$(this).parent('.list-row').find('.update-data').html('<textarea style="height:'+listDataHeight+'px">'+listText+'</textarea>');
}
});
//update todo script
$(document).on('click','.update-todo',function(){
var listText= $(this).parent('.list-row').find('textarea').val();
if($.trim(listText)=='')
{
$(this).parents('.row-parent').find('.list-error').text('You must enter something!');
}else{
$(this).attr('class','edit-todo');
$(this).html('✎');
$(this).parent('.list-row').find('.update-data').attr('class','list-data');
var listText= $(this).parent('.list-row').find('.list-data').html(listText);
$(this).parents('.row-parent').find('.list-error').empty();
}
});
// line through the todo list script
$(document).on('click','.list-data',function(){
$(this).toggleClass('line-through');
});
My Suggestion
Dear Developers, I hope you have got How to create Todo App using jQuery. Now you can easily implement the above functionality in your project.
If you have any doubts or questions related to this tutorial, you can ask me through the below comment box. I will reply as soon as possible. Even you can suggest web technology coding topics.
Thanks For giving time on this tutorial…