
If you have to create your project using Django framework, then you will have to learn How to create Django Project. After that, you can write your own custom code in the installed project to develop your own web application.
So, I have provided here all the required information about creating project in Django and its directory structure step by step.
Before lerning it, you will have to learn this topic –
How Install Django on Windows & Ubuntu
Django Project
A Django project is the collection of some folders, files & applications that are used to develop a custom web application quickly.
Example –
college-project may contain the following Django applications
- signup-app
- login-app
- attendance-app
- fees-app
- exam-app
- result-app
Create Django Project
Before creating Django project, make sure Django must be installed in your system globally or in virtual environment
Then, run this command in your terminal to create a Django Project quickly
django-admin startproject projectName
Example –
Suppose that we have to create a Django project with the name of myproject, then run this command
django-admin startproject myproject
After running successfuly the above command, you will get the following project directory –
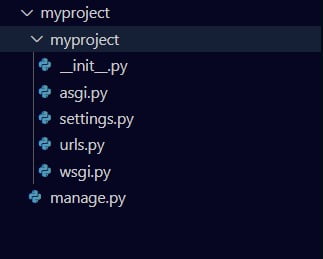
Django Project Folder Structure
As you have to create a Django project in the previous step Now, You have to understand its directory structure that is most important to develop a project in Django framework.
This structure has two root folders with the same name myproject. So, You can say the first folder name Outer Project Folder and the second one Inner Project Folder
Django Project Structure –
myproject
  |__myproject
  |     |__ __init__.py
  |     |__ asgi.py
  |     |__ settings.py
  |     |__ urls.py
  |     |__ wsgi.py
  |__ manage.py
Now, we will understand the usage of each folder and files of Django projects step by step. So, Don’t skip any one of the given steps otherwise you will miss some important point.
Outer Project Folder
The outer Project Folder contains only a single file named manage.py and Inner Project Folder.
It is also Know as Root Directory
manage.py
This file is mainly used for command utility to deploy, execute & debug web applications.
We need not work in this file.
Inner Project Folder
The Inner Project Folder contains five default files named __init__.py , asgi.py , settings.py , urls.py, wsgi.py
__init__.py
This file does not contain any lines of code. It is created only for considering its parent folder as a python package
asgi.py
This file is used when we configure Asynchronous Server Gateway Interface to communicate between async-capable web application and web server.
Even It provides us a standard interface for both synchronous & asynchronous python app
urls.py
In this file, all the URLs of web application are defined
settings.py
This files contains all the information of Database config, Middleware, template, installed application, validators & more of the web applications.
wsgi.py
This file is used when we configure Web Server Gateway Interface(WSGI) to communicate between web application and web server.
Even It provides us a standard interface for synchronous python app.
We work in this file when We need to work related to webserver such as deploying website & using appache server.
This file Contains these lines of code –
Auto Created folders & files after running Web Server
When you run your web server, one additional folder named __pychache__ that contains some more files and another file db.sqlite3 will be created automatically within the root directory folder.
myproject
  |__myproject/
  |__ __pycache__/
  |        |__ __init__.cpython-38.pyc
  |        |__ setting.cpython-38.pcy
  |        |__ urls.cpython-38.pcy
  |        |__ wsgy.cpython-38.pcy
  |__ db.sqlite3
  |__ manage.py
If you delete them, then they will be again created while you run server again.
You need not to do anything with these folders & files. These are created mainly to remove chache and make faster web application.
What’s Next
Now You have to learn How to create Django App step by step