
Hello Developers, In this tutorial, you learn how to display form input data in a table using react js with some simple steps that are very very easy to understand & implement in web applications.
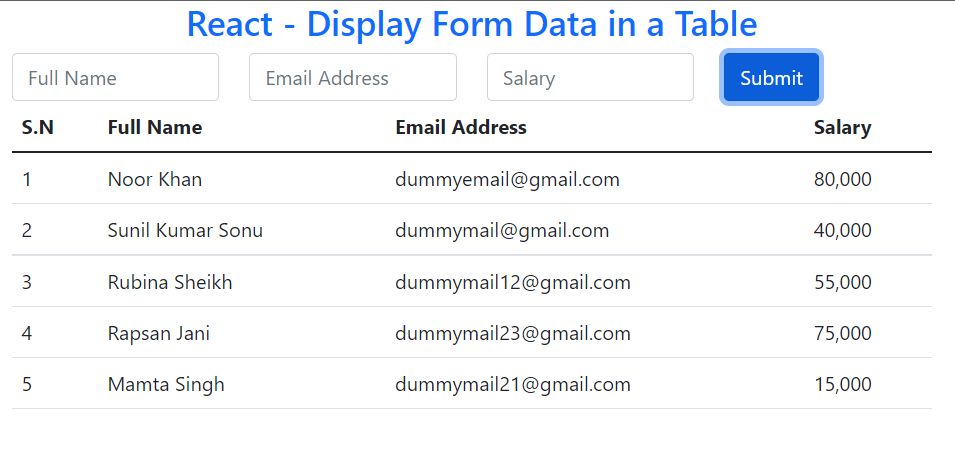
If you need a feature that works as – If you enter something into the form input field and click the submit button then The form input data will display in a table format.
Here, I have created this functionality with three input fields as Full Name, Email Address & salary. If you need more & other input fields then you can easily customize it but First of all, you will have to understand its working concept.
Display Form Input Values in a Table with React Js
In this tutorial, I have created functionality to display form data in a table with React Js using functional components. Once, you learn it, you can easily create it yourself using the class component.
Learn Also –
Create Dynamic Table From JSON
How to Create Accordion in React Js
Create a Simple React Todo App
Before getting started, you have to create react app with npm and create the following folders & files within its default folder structure
reactapp/
  |__public/
  |    |__images/
  |__src/
  |   |
  |  display-form-data-in-table/
  |       |__DisplayFormDataInTable.js
  |       |__FormInput.js
  |       |__Table.js
  |__App.js
  |__index.js
I have used bootstrap 4 to create a responsive weather app. So, You should run the following command
npm install bootstrap
Also, you have to import it into the App.js
import "../node_modules/bootstrap/dist/css/bootstrap.min.css";
For more information, you can learn How to use Bootstrap in React Js
1. Create DisplayFormDataInTable Component
To create DiplayFormDataInTable component, you will have to implement the following steps –
Step-1: First of all, Create a DisplayFormDataInTable component and export it. Also, return some HTML div with bootstrap 4 class in the form of JSX.
Step – 2: – Import FormInput Component from "./FormInput" directory and call it as <FormInput /> within the return() method of the function component.
Step-3: Also, Import Table Component from "./Table" directory and call it as <Table /> within the return() method of the function component.
Step-4: Create a formInputData state using useState() hooks and an object with some properties like fullName, emailAddress & salary. You should declare each property with empty value and Also, you should keep property name should be similar to the name of the form input field.
Step-5: Define an event handler handleChange as an arrow function and write some lines of code to control the values of each input field separately.
newInput– It will hold the latest value of each input field...data– It will assign the value of each input field to each property of an object that is defined withinformInputDatastate. For more information, you should learn javascript spread operatorsetformInputData(newInput)– It will update the value offormInputDatastate with the latest input values
Step-6: After that, Pass the handleChange to the <FormInput /> component as an props
Step-7: Create a tableData state using useState() hooks and pass an empty array.
Step-8: Define the event handler handleSubmit to submit the form data by writing some line of code according to the following points –
- First of all, declare the
preventDefault()to prevent from loading the page after the form submit. - Check every input field is empty or not by using the object.values() & array.every() If no one input field is empty then implement the next points.
- Take all form input values from the
formInputDatastate using spread operator and assign them to thenewData - Pass
newDatato thesetTableData()to update the table data - Then make empty each property of the object that is declared in the
formInputDatastate.
File Name – DisplayFormDataInTable.js
import React from "react";
import { useState } from "react/cjs/react.development";
import FormInput from "./FormInput";
import Table from "./Table";
function Main(){

 const [tableData, setTableData] = useState([])
 const [formInputData, setformInputData] = useState(
     {
     fullName:'',
     emailAddress:'',
     salary:''
    }
 );

 const handleChange=(evnt)=>{
     const newInput = (data)=>({...data, [evnt.target.name]:evnt.target.value})
    setformInputData(newInput)
 }

 const handleSubmit= (evnt) =>{
     evnt.preventDefault();
     const checkEmptyInput = !Object.values(formInputData).every(res=>res==="")
     if(checkEmptyInput)
     {
      const newData = (data)=>([...data, formInputData])
      setTableData(newData);
      const emptyInput= {fullName:'', emailAddress:'', salary:''}
      setformInputData(emptyInput)
     }
 }

 return(
     <React.Fragment>
     <div className="container">
     <div className="row">
         <div className="col-sm-8">
         <FormInput handleChange={handleChange} formInputData={formInputData} handleSubmit={handleSubmit}/>
         <Table tableData={tableData}/>
         </div>
         <div className="col-sm-4">

         </div>
     </div>
    </div>
     </React.Fragment>
 );
}
export default Main;
2. Create Form Component to Add Data
To create a Form Component to add data, you will have to implement the following steps –
Step-1: First of all, create a FormInput function component and export it at last. Even return HTML form in the form JXS.,
Step-2: Get three props such as handleChange, formInputData & handleSubmit (That come from the DisplayFormDataInTable component ) as an object to the FormInput().
Step -3: Declare handlechange with onChange An event in each input field except the submit button.
Step4. Declare handleSubmit with onClick Event is only the submit button.
Step-5: Also, get the value of each input field from the formInputData like –
- Full Name –
formInputData.fullName - Email –
formInputData.emailAddress - salary –
formInputData.salary
and assign them to the value attribute in each related input field
File Name – FormInput.js
function FormInput({handleChange, formInputData, handleSubmit}){
return(

    <div className="form-row row">
      <div className="col">
        <input type="text" onChange={handleChange} value={formInputData.fullName} name="fullName" className="form-control"  placeholder="Full Name" />
      </div>
      <div className="col">
        <input type="email" onChange={handleChange} value={formInputData.emailAddress} name="emailAddress" className="form-control" placeholder="Email Address" />
      </div>
      <div className="col">
        <input type="text" onChange={handleChange} value={formInputData.salary} name="salary" className="form-control" placeholder="Salary" />
      </div>
      <div className="col">
        <input type="submit" onClick={handleSubmit} className="btn btn-primary" />
      </div>
    </div>


)
}

export default FormInput;
3. Create Table Component to Display Data
Now, create a Table component to display data by implementing the following steps –
Step-1: First of all, create a Table component with a props tableData as an object and return the HTML table in the form of JSX. After that export it at last position.
Step-2: Appy javascript map() with tableData Print each form input data in the table.
File Name – Table.js
function Table({tableData}){
    return(
        <table className="table">
            <thead>
                <tr>
                    <th>S.N</th>
                    <th>Full Name</th>
                    <th>Email Address</th>
                    <th>Salary</th>
                </tr>
            </thead>
            <tbody>
            {
                tableData.map((data, index)=>{
                    return(
                        <tr key={index}>
                            <td>{index+1}</td>
                            <td>{data.fullName}</td>
                            <td>{data.emailAddress}</td>
                            <td>{data.salary}</td>
                        </tr>
                    )
                })
            }
            </tbody>
        </table>
    )
}

export default Table;
4. Render DisplayFormDataInTable Component
To render DiplayFormDataInTable component, you will have to import it in the App component and render it as <DisplayFormDataInTable /> within the return() method.
File Name – App.js
import "../node_modules/bootstrap/dist/css/bootstrap.min.css";
import DisplayFormDataInTable from "./display-form-data-in-table/DisplayFormDataInTable";
function App() {
  render(){
  return (
    <DisplayFormDataInTable />
  );
  }
}
export default App;
5. Run App to Display Form Data in Table
Now, you can display form data in the table yourself by running the React App with the following command
npm start
After that, you can see the form data in a table by opening the following URL in your web browser
http://localhost:3000