
HTML Elements: If you create a web page with or without content then it is necessary to use elements. otherwise, the web browsers will not display that web page or content in a proper format.
By the way, all the content can be displayed without using elements. But this method is totally wrong. Because if you do this. So all the content will be shown in the same format in the browser. From this, it will not be known for which content has been given.
That’s why we must write content with HTML Elements. So that the browser can display all the content in different formats according to the default behavior of its ELements.
For example – If you use HTML elements then –
- Headings will be shown as headings.
- Paragraphs will be shown as paragraphs.
- Lists will be shown as lists.
- Tables will be shown as tables.
In this tutorial, I have given all points of elements from basic to advanced levels. By learning from this, you can show the content on the web page in a better way.
What’s Before –
Before proceeding further in this tutorial you should know the following topics –
What is HTML Element
- HTML Elements is a container. In which content and other HTML elements are kept
- HTML Elements are a combination of Open Tags, Close Tags, and content.
- Elements of HTML are used to display the content properly on the web page.
- Web Browser easily understands the Element that how to show the content.
- HTML elements are not visible in the web Browser. Only the document or content is visible.
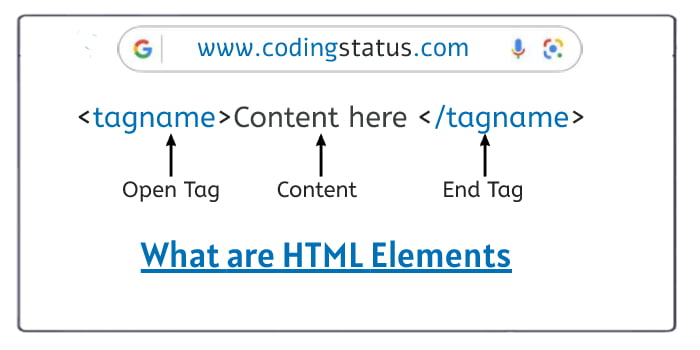
HTML Element Syntax
Here is the syntax of the HTML element.
<tagname>Here is content</tagname>
Where –
- <tagname> – Open Tag
- content – Text
- </tagname> – Close Tag
Elements are not case-sensitive. This means you can write <tagname></tagname> in any case. Like Camel Case, Upper Case, or Lower Case. But according to Coding Standards, it should be written in lowercase only.
- <tagname></tagname> – Lower Case ( Recommended)
- <TagName></tagname> – Camel Case
- <TAGNAME></TAGNAME> – Lower Case
Note: – There are some elements whose content is to be displayed on the web page, they are written inside the <body></body> element only.
Basic HTML Elements
HTML Element syntax is made according to the name of the content. The name of the tag is taken from the first letter of most of the content.
| Content | HTML Tags | HTML Elements |
| Body of Web page | <body></body> | <body> another Elements</body> |
| Head of Web Page | <head></head> | <head> another Elements</head> |
| Paragraph | <p></p> | <p> Paragraph Text</p> |
| First Heading | <h1></h1> | <h1>First Heading Text</h1> |
| Second Heading | <h2></h2> | <h2> Second Heading Text</h2> |
| Third Heading | <h3></h3> | <h3> Third Heading Text</h3> |
| Fourth Heading | <h4></h4> | <h4> Four Heading Text</h4> |
| Fifth Heading | <h5></h5> | <h5> Fifth Heading Text</h5> |
| Sixth Heading | <h6></h6> | <h6> Sith Heading Text</h6> |
HTML Element Example
In this example, we have taken the heading element and paragraph element.
<!DOCTYPE html>
<html>
  <head>
  </head>
  <body>
    <h2>HTML Elements</h2>
    <p>This is the first paragraph</p>
    <p>This is the second paragraph</p>
  </body>
</html>
HTML Nested Elements
In the case of the Nested element, an element remains inside another element.
You can create another element inside any element as you can see below,
- <head> & <body> elements remaining inside the <html> element.
- <h1> & <p> elements inside the <body> element,
- <strong> inside the <p> element.
<!DOCTYPE html>
<html>
   <head>
      <title>Page Title</title>
   </head>
   <body>
      <h1>Heaidng Tex</h1>
      <p>Paragraph <b>text</b></p>
   </body>
</html>
Note –
Nested Elements are always made of different types of elements. This means that the same element must not remain inside itself.
For Example –
- <body> must not contain <body> elements only.
- <head> must not contain <head> elements.
- <h1> must not contain <h1>.
- <p> must not contain <p> elements.
Must be End Tag in HTML Element
If there is a close tag of these elements, do not forget to put them. Otherwise, the layout structure of the content will not display properly in the web browser.
<!DOCTYPE html>
<html>
   <head>
      <title>Page Title</title>
   </head>
   <body>
      <h3>Heaidng text
      <p>Paragraph text </p>
   </body>
</html>
.
Types of HTML Elements
By the way, there are many different elements that have been created according to the documents and content. But according to the behavior of Elements, it is mainly divided into three parts –
- Empty elements
- Block-level elements
- Inline elements
Let’s understand it one by one from the next steps –
HTML – Empty Elements
Elements that do not have any content and close tag are called Empty Elements.
Empty Elements are Self Closing Elements, for this you can put a / forward slash if you want.
- <br /> – This is Breaking Elements, it is used to give line break.
- <hr /> – This is Horizontal Elements, it is used to give Horizontal line.
<!DOCTYPE html>
<html>
   <head>
      <title>Empty Elements</title>
   </head>
   <body>
      <p>paragraph text</p>
      <hr>
      <p>This is another paragraph<br /> Now it starts from new line</p>
   </body>
</html>
HTML – Block-level Elements
Block-level elements cover the full screen horizontally.
Block-level elements always start on a new line.
Important Block-level elements –
- <h1>Content</h1> – First Heading Element
- <h2>Content</h2> – Second Heading Element
- <h3>Content</h3> – Third Element
- <h4>Content</h4> – Fourth Heading Element
- <h5>Content</h5> – Fifth Heading Element
- <h6>Content</h6> – Sixth Heading Element
- <p>Content</p> – Paragraph Element
- <div>Content</div> – Division Element
Block-level elements Example –
<!DOCTYPE html>
<html>
   <head>
      <title>block-level elements</title>
   </head>
   <body>
      <h1>Heaidng text</h1>
      <p>Paragraph text</p>
      <div>division text</p>
   </body>
</html>
HTML – Inline Elements
Inline Elements cover only the width that is required.
Inline Elements do not start on a new line.
Inline Elements do not cover the full screen horizontally.
Important Inline elements –
- <a href=”#”>Content</a> – Anchor Elements.
- <span>content</span> – Span Elements.
- <strong>content</strong> – Strong Elements.
- <b>content</b> – Bold Elements.
Inline elements example –
<!DOCTYPE html>
<html>
   <head>
      <title>inline Elements</title>
   </head>
   <body>
      <span> span text</span>
      <strong>strong text</strong>
      <b>bold text</b>
   </body>
</html>
Use of HTML Elements
To use HTML elements, we can –
- display content or documents correctly on the web page.
- create Navigation Links from Anchor Elements <a> so that one can easily go from one page to another.
- create tables from <table> elements, in which any data can be kept in the format of the table.
- create a list from <list> elements, which can keep any data in the format of the list.
- display images on the web page with <img> elements. Different types of forms can be made. Like – Registration Form, Login Form, Contact Form, Feedback Form, Comment Form & more.
Can make Video Player and Audio Player.
In the above points, We have seen the use of some important HTML Elements. There are many more elements. As you continue further, you will know more about its uses.
Advantages of HTML Elements
- Elements are very easy to learn.
- Elements support all types of Web Browsers.
- Elements are also compatible with other web languages (CSS, JavaScript, PHP, & more). This means we can write it with any other Web Language as well.
- The document and content created from Elements can be easily opened in Web Browser even without an Internet Connection.
Disadvantages of HTML Elements
An HTML element does not have any Logic and Conditions. So, It does not work like a programming language
An HTML element can not create dynamic content
An HTML element can not create attractive web pages & content without using CSS
HTML elements may look different in different Web Browsers.