
In this tutorial, When you create a react application using npm, then you will get a default React app Folder Structure. you have to work with this structure to build a new web project. So, you must know everything about it in detail.
You can also customize & modify the React structure according to your project requirements. Once you learn working of every file/folder, then you will definitely understand to use it in a proper way
What’s Before –
You should learn the following topics before going to the next step. If you know, You can skip them
React App Directory Structure
You can see the react app directory structure that is created using the create-react-app tool in the following image. Now you will learn to use each folder & files one by one from the next step. So, you must skip any one of them. otherwise, you can’t build your project in the right way. Even the largest project will be very difficult to develop for you.

first-app
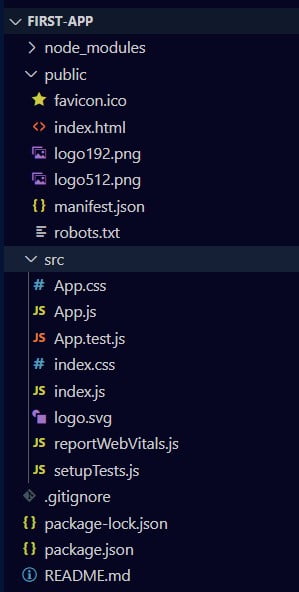
first-app is a project is a name that always must be in lowercase. It is created when you run the following command in your terminal.
npx create-react-app first-app
Note – Visual studio code always displays project name/root folder name in the capital letter either it is uppercase or lowercase. So, you should not be confused
node_modules
In the node_modules folder, you will also get various folders of all the required dependencies & packages that may be used for building you react app. For example – Webpack, Babel, JSX, Jest & more.
You need not modify the node_module. Even you have to do nothing with this folder & its subfolders. It is already configured with the react app. So, you should leave it as it is and work in the other files/folders.
You can see all the folders by clicking the node_modules. You need not understand & know about them. So, here I will not explain their works & usage. yet you want to know then, you can search on google search. you will
public
Webpack does read the public folder, It only reads files that exist in the src folder. So, If you place files in the public folder, they will not be processed by the webpack. But Those files will be copied into the build folder when you run the npm build command at the time of deploying your application.
If you put assets in the public folder and you have to give their reference in your project, then you will have to use a special variable that is called PUBLIC_URL.
A file that remains in the public folder, will be accessible by %PUBLIC_URL%.
For example –
favicon.ico
This the default react icon that always remains in the public folder. you can also put here your own project icon but the icon extension must be .ico and the icon name may be anything.
You can remove favicon.ico when you place a new favicon for your project/website.
When you open your app in the web browser, you will see an icon in the tab on the left side. It is the symbol of your application. So, you should not leave it.
index.html
This is the index file that displays when the react app opens in the web browser. It contains the HTML template of the react application.
index.html file is the root file of the react app. Everything will be rendered through it on the front end. So, Don’t try to change & remove this file from the public folder.
Note – index.html must exist in the public folder and you must not delete it otherwise you will get an error.
logo192.png & logo512.png
These are the logo of react js. it is placed just for the initial view of react app. you can remove/leave it depends on you.
manifest.json
manifest.json provides the metadata like short_name, name & icons in the form of JSON for a react application. It may be installed on the mobile or desktop. So that you can directly open the react application with its installed favicon.
Due to the manifest.json file, users get a notification to install react application on their mobile or desktop.
You must not remove manifest.json but you can modify JSON values according to your project
robots.txt
The robot.txt file is given just for SEO purposes. As a developer, you need not do anything with this file. This file is not related to development.
src
In the src folder, You can put all the js, CSS, images, components file & other assets of your projects.
By default, we get the following files that are necessary to understand their usages. you can create your own files according to these files for developing your projects.
App.css
App.css file contains a default CSS code and import into the App.js file. It is also global, you can import another file.
You can create your own CSS file like App.css but make sure that its name must start with the uppercase letter and.
for example – Myapp.css
App.js
App.js is a parent component file of your react app. It is imported into the index.js file to render content/HTML in the root element that remains in public/HTML.
You can also create your own component file according to App.js but make sure that its extension must be .js and its name must start with an uppercase letter.
for example – Myapp.js
App.test.js
App.test.js gives us a testing environment. Basically, it’s written code to protect the react application to be crashed.
We also need not modify & remove this file from the react application.
index.css
index.css file contains some default css code for index.js. You can modify/add some new CSS code according to your project design pattern.
index.js
index.js file is an entry point of react app. Means that all the component renders through this file to the index.html.
Basically, your application executes properly with the help of index.js. Even all the js files of components are imported in this file.
for example – As App.js file is imported with using import App from './App' . you also have to import your own Myapp.js file using the import Myapp from './Myapp';
logo.svg
This is the default logo of react js. You can remove it and place your project logo.
reportWebVital.js
reportWebVital.js is related to the speed of your application. You also need not to do anything with this file.
setupTest.js
In this file, @testing-library/jest-dom is imported. You need not modify and remove it from the application
.gitignore
.gitignore file is used to ignore those files that have not to be pushed to the git.
By default, dependencies, testing folders/files are defined in the .gitignore. When you push your app to the git, these folders/files will not be pushed.
package-lock.json
package-lock.json file maintains a version of installed dependencies.
package.json
All the dependencies are defined in this file. It maintains which dependencies are necessary for our application
README.md
In this file, Some instructions are written to configure and set up the react application. Even you can also write more instructions for your project that will help the developer to configure it easily.
What’s Next
You will learn the next React Render Method in the upcoming tutorials. If you really want this topic, then do comment in the comment box that is given below.